What is ZOOM?
Zoom is a web conferencing tool that unifies cloud video conferencing, online meetings, and collaboration in an easy to use platform. Click to watch the video.
Zoom's extensive features, compatibility with desktop and mobile devices and H.323 room system, allows participants to have a rich web conferencing experiences with both NUS and external users.
Features:
- Easy to launch and join with up to 300 participants
- HD video, high quality audio using VOIP
- Screen sharing and collaboration features
- Co-annotation and whiteboard
- Video breakout rooms
- MP4 recording
Current Update
Due to the current situation, there is an increase of online conferencing usage. Take note of the following:
- Please use Zoom's Online Test Site [https://zoom.us/test] for all testing purposes.
It allows you to start a session, invite participants, test your audio, webcam and share your screen. Only the Breakout Room and Recording function is not available on the test site. - If you are using LumiNUS, keep to the slot as scheduled. Only start, launch and join the session 10 minutes before start time; and end the session promptly. Do not join at any other times.
- You can also sign up for your own NUS Zoom Education License account on NUS's Zoom Portal. It is a Zoom Meeting Licensed License for up to 300 participants per session.
Using Zoom with LumiNUS
- Zoom is integrated in LumiNUS. It is based on the Zoom PRO license: 300 participants per session.
- To schedule a session. Login to LumiNUS, go to your module > Tools > Conferencing and click Create Session.
Provide the session title, date, time, duration and access. Select "Send Emails" if you want students to be notified. Click Create.

- Ten minutes before the session starts, click on the session title. The browser will prompt you to launch your Zoom app. It will prompt you to download if you have not.

- Take control of the session, be the Host. Click on Participants Button > Claim Host. Type in the session's 6 digit Host Key displayed in LumiNUS.

You are now ready to conduct the online discussion with your students.
To record the session, click on the Record button. Zoom will record the screen, video and audio. If you do not see the Record button, please Claim Host first.
The MP4 will be in your PC's My Documents/Zoom/SessionName folder a few minutes after the meeting ends. You can then upload the MP4 file to your module's Multimedia folder in LumiNUS.
Text chat will have to be manually saved from within the chat window itself.
Download
Download Zoom for: Win | Mac | Linux | iPhone | Android.
Once installed, join the Test Meeting and test your audio.
Video Guides
Scheduling and Joining
- Join a Meeting
- Schedule a Meeting with Zoom Portal / Desktop Client (Not for LumiNUS users)
- Meeting Controls
Audio, Video & Sharing
Advanced
Additional user guides can be found on the Zoom support site.
FAQs
A) Prevent participants from unmuting themselves.
B) Prevent participants from screen sharing:
- In the host controls, click the arrow next to Share Screen and click Advanced Sharing Options.

- Under Who can share? choose Only Host.
- Close the window.
Note
- When you join a session, your display name, email address, device information like type, name and IP address will be logged for troubleshooting purposes.
- You will be encouraged to turn ON your webcam for some lessons. Your host will have to share with you what is the recording for and intended audience.
- Make sure you and your environment are safe and ready before you Unmute Mic and Start Video.
- Use Virtual Background or position yourself with a wall behind you.
A Few Days Before
- Remember to download and install the latest Zoom client: Win | Mac | Linux | iPhone | Android.
- Join a Zoom Test Meeting to check your device capabilities.
15 Minutes Before
- Find a quiet space with a stable WiFi connection.
- Join Zoom following the instructions your instructor has provided:
- If your course is using Canvas, go to your course's Zoom tool.
- It could also be a join link URL sent via email or a calendar invite.
- It is better run the Zoom App or Desktop Client instead of running it from the browser.
- Close unnecessary windows or apps (e.g., Skype).
- Test your headset and webcam.
During the Zoom Meeting
- Click Start Video to begin sending your webcam.
- Click the Chat bubble to ask questions via text or as informal discussion. You can chat to everyone or a specific person. Some instructors may want a certain format like they will not entertain text chat until it comes to Q&A segment.
- Find out who else is in the meeting by clicking Participants. This is also where you can "raise your hand" to ask a question, answer a question, or use the Yes/No button.
- Always be prepared to share your screen. Close all other browsers and apps not required for the class.
- At the end of the class, click Leave Meeting.
View options. Toggles between:
- Speaker View: To focus on the speaker.
- Gallery View: To show all participants (up to 25 people).
- Full Screen: To maximize screen.
- Participants and attendees can select side-by-side mode during screen sharing.
Zoom Menu
The Zoom menu is at the bottom of the Zoom window. Hover your cursor over it if it is hidden. In screen sharing mode, it goes to the top of the screen.

Mute: Switch to turn on/off your microphone.
Start/Stop Video: Sending your webcam.
Invite: To invite others.
Share Screen: Allows you to share your desktop screen and specific windows.
Chat: To send messages to everyone or a specific person.
Record: If the host allows it. Not provided as a default. Records as a MP4 on your computer Documents\Zoom\Session Title.
Leave Meeting: Click this at the end of the meeting. Do not leave the Zoom meeting open.
More: Allows you to raise your hand, and other participants quick response button.
Tips
- Provide a clear video. Keep your face lit, and the background neat and tidy. A clean wall will be the best. If the window is behind, pull the blinds or curtains.
- Microphones pick up all ambient noise, so keep your mic muted unless you are speaking.
- Focus please. Avoid any other activities that will distract you.
Click the More button in Participants panel.
- Check "Mute Participants on Entry"
- Uncheck "Allow Participants to unmute themselves."

Use a Micro USB cable to connect the Polycom Trio with the laptop. You will need to select the Polycom's Speaker and Microphone device in Zoom. Run the Test Speaker and Microphone to properly configure it.
https://support.zoom.us/hc/en-us/articles/201362283-Testing-computer-or-device-audio#collapsePC

Please go to https://www.zoom.us/signin and sign in using your NUS Email Address.
You can check My Profile on the Zoom Portal.
You can also check your profile on the Zoom Client.

Your colleague will have to assign you scheduling privileges for their Zoom Licensed Account:
|
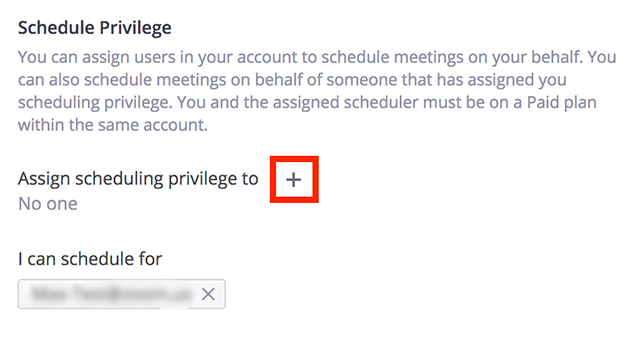
The next time you schedule a meeting, you will see a new field called "Schedule For" with a pull-down option.
Alternative Platform
You can also use:
- Microsoft Teams for chat, file sharing and video meet (up to 250 participants).
- Skype for Business for meeting, sharing and instant messaging.
(Note: All NUS Staff and Students have access to Office 365, Teams and Skype for Business with their NUSNET ID).