Log In
1. Go to http://wiki.nus.edu.sg/ or directly to any wiki space (if you know the URL).
2. Click Log In, on the top right hand corner, next to the search box.

3. Log in with your NUSNET ID and password. Omit the domain.

4. You are now logged in. Instead of the Log In link, you will see your name.

Add a Page
- When you add a page, the new page will be created one level below the current page.
- Page titles must be unique within the wiki.
1. Go to the page where you want to add a new subordinate page (known here as a Child page). Click Add > Page.

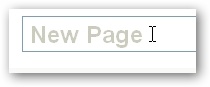
2. Click in the title field, indicated by the grey New Page title. Type the page name/title.

3. Put in content in the text field. Click Save (bottom right corner of text field) when ready.

4. Done! View your handiwork.
- Refer to Organise Pages to learn more about the page structure of the wiki and rearranging pages
- You can always rectify page placement later, so do not be unduly worried about adding a page incorrectly.
It is good practice to:
- Use the What did you change? field below the text editor to document the changes you have made.
- Uncheck Notify watchers if your edit is minor or does not warrant an automatic email notification to those who are tracking changes on the page or wiki.
Edit a Page
1. To edit a page, click the Edit button on the top right of the page.

If you do not see an edit button, you are either not logged in to Wiki.nus or you do not have permission to edit that page.
2. Edit the page. Click Save (bottom right of the text box) when you are done.
If your change is a minor one, remember to uncheck the Notify watchers checkbox below the text editor. This will prevent an email notification from being sent (refer to Tracking Changes).

If you see a warning that someone else is editing the page, such as the one below, do not continue editing. You should click Cancel and come back to edit the page another time. If you proceed, one of your edits may be overwritten without being saved.

Organise Pages
Understanding Page hierarchy
The diagram below shows the hierarchy of pages in an example wiki.

You can see that there are three levels. When you click Add Page, you are adding a new page one level down.
So, if you add a page from Example Wiki (Level 1), you will create a page on Level 2.
If you add a page from Understanding Pages or Formatting (Level 2 pages), you will create a page on Level 3, and so on.
Rearranging Pages
Sometimes, you may accidentally create a page on the wrong level. If you have done so, you can easily rearrange the hierarchy and order of pages.
Go to Browse > Pages.

For View, click Tree. Continuing the example above, click the plus icons to open the branches. You will see the following:

By default, pages at each level are ordered alphabetically.
You can click and drag individual pages to any part of the wiki.
In this example, we want the Basic page to be above the Advanced page.
To do this, drag Basic between Formatting and Advanced until you see a thin grey line. Drop Basic above Advanced.

You will now see that Basic appears before Advanced. If you want to return to alphabetical display, click the "A" icon.
Page Title/Name Conventions
- Page titles must be unique throughout the wiki.
- If possible, Page titles should make sense on their own. E.g. The Basic and Advanced pages in the example above should be renamed Basic Formatting and Advanced Formatting respectively.
Format Pages
Generally, you can use the WYSIWYG (Rich Text) editor to format your content.
While this may seem limited, there are ways to add variety to your wiki pages.
Insert Formatting Macros
- You can access formatting functions through macros. In the text editor, type { to bring up the macro auto suggest, then click Open Macro Browser.

- Alternatively, on the editor toolbar, click Insert, then Other Macros.

- You will get a pop up with numerous options. Click Formatting on the sidebar.

- There are several formatting macros to choose from. You can also explore other types of macros, which may come in handy.
Create a link
You can create links to:
- pages within Wiki.nus (#internal)
- documents (#attachments)
- other web sites (#web)
Type [ in the text editor. The link auto-suggest will pop up.
If none of the suggested wiki pages are listed, or you want to link to other content, click the Link icon on the text editor toolbar.

Internal links
Search
Search is the best way to link to another Wiki.nus wiki.
- Click the Search tab. You can search all wiki spaces or your wiki space.
- Enter your search term in the text box.
- Click Search.
- Click the link of the page you want to link to.
- Enter the link text if necessary.
- Click OK.
Recently Viewed
Recently Viewed is a list of Wiki.nus pages which you have recently viewed. Many times, this will have the page that you want to link to.
- Click the Recently Viewed tab. You will be shown a list of the most recent pages you have viewed.
- Click the page that you want to link to.
- Enter the link text if necessary.
- Click OK.
Attachment links
Attachments allows you to upload a file and create a download link for your readers. You can attach files up to 20MB per attachment.
- Click the Attachments tab.
- Click Browse. Use the file explorer to find the file which you want to attach, then click Open.
- Click Attach. The file you want to attach now appears on the list.
- Click the file's link.
- Fill in the link text. e.g. If you type "Download the lecture slides", this text will become the link: Download the lecture slides.
- Click OK.
Web links
Web links allows you to create links to web sites outside of Wiki.nus.
- Click the Web links tab.
- Type or paste the URL of the web site you want to link to.
- Click OK.